Final Assessment

Life Through a Lens

The brief:

“….Narrative surrounds us in momentary experiences as well as within a sequence of events. The challenge of this assessment task is to capture narrative moments within single photographs as well as (on a broader level) the series that the photographs make up. You are encouraged to explore the idea that in the realm of photography, the whole is the sum of its parts and the parts can stand alone: both aspects contain narrative…

…Choose your own phrase. It must be a phrase, not a complete sentence, past, present or future tense. This phrase will be the theme which drives your photography for this second assessment.”

title

Rationale:

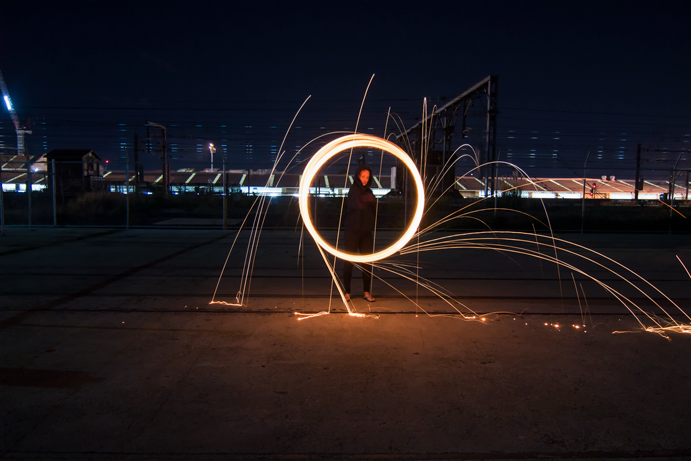
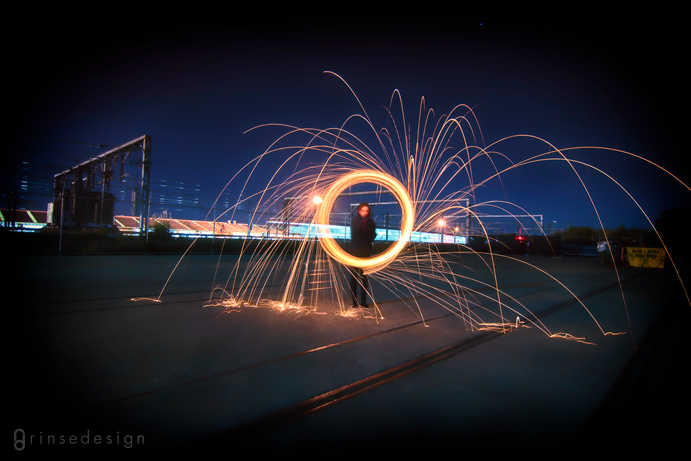
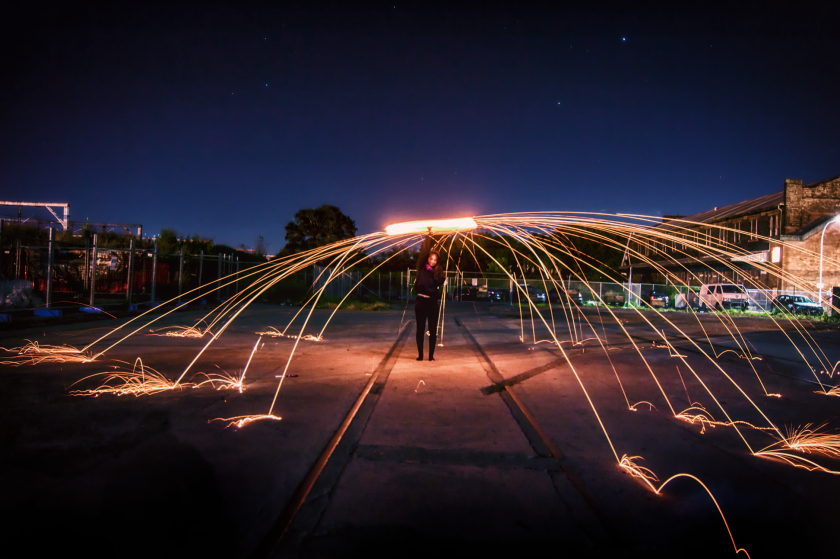
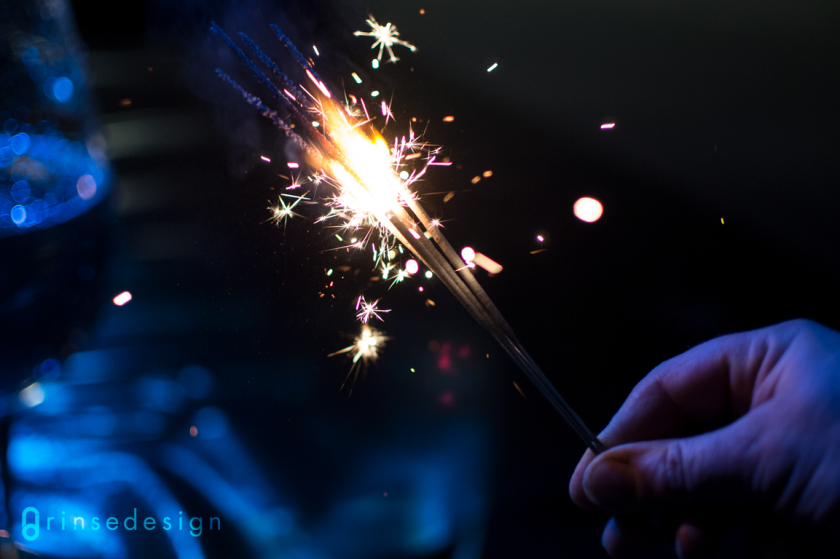
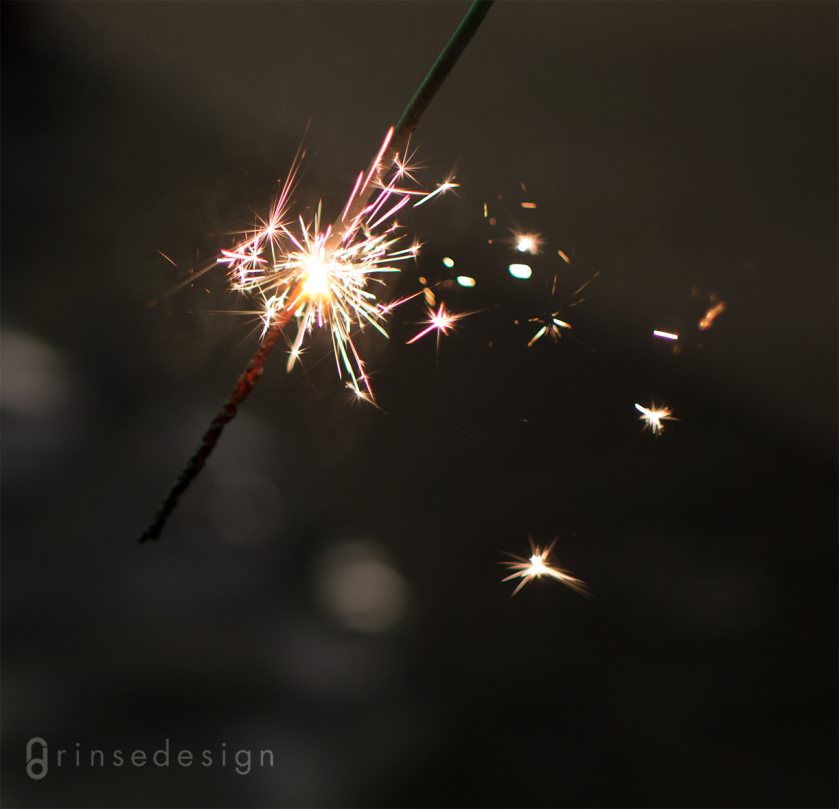
The light after dark is a photographic narrative that follows a soul who is discovering the benefits of nurturing ones own light in the face of darkness. From a tiny flame that flickers and struggles to exist, to a blazing fire which lights up the landscape, and all of the steps of self discovery in between; her light is a subjective concept, one that is within the realm of the beholder to translate in a way that is easiest to relate to.

_DSC0185

The story behind my choosing of this phrase originally was that after shooting water in a very high shutter speed for my first assessment, I wanted to experiment with something that was the complete flip side. Under pressure to choose a phrase by the deadline, and with the knowledge that I had the option of changing it later on, I chose ‘the light in the dark’ with the vague idea that I might do something to do with long exposures.

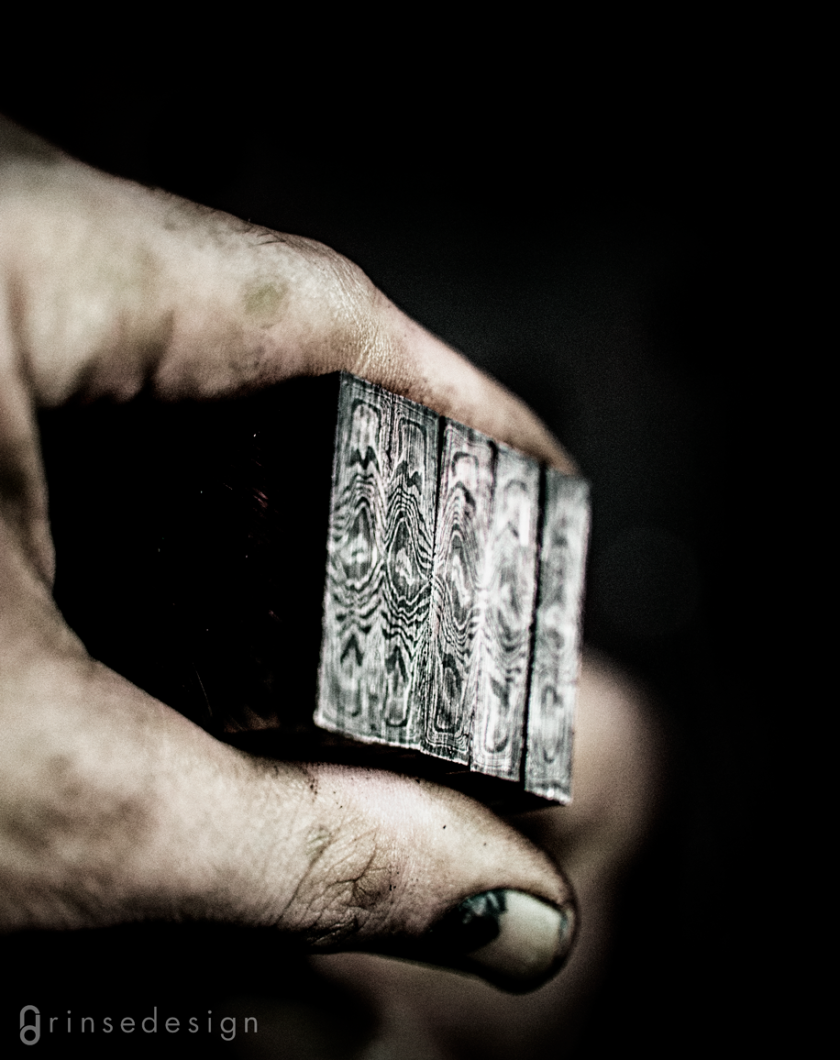
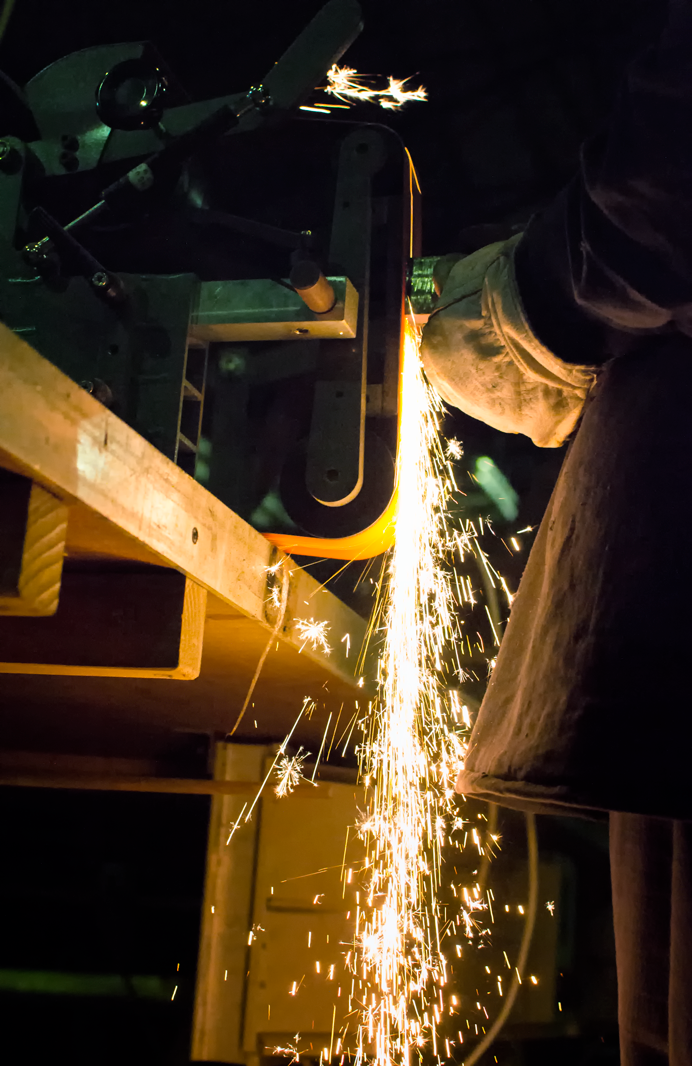
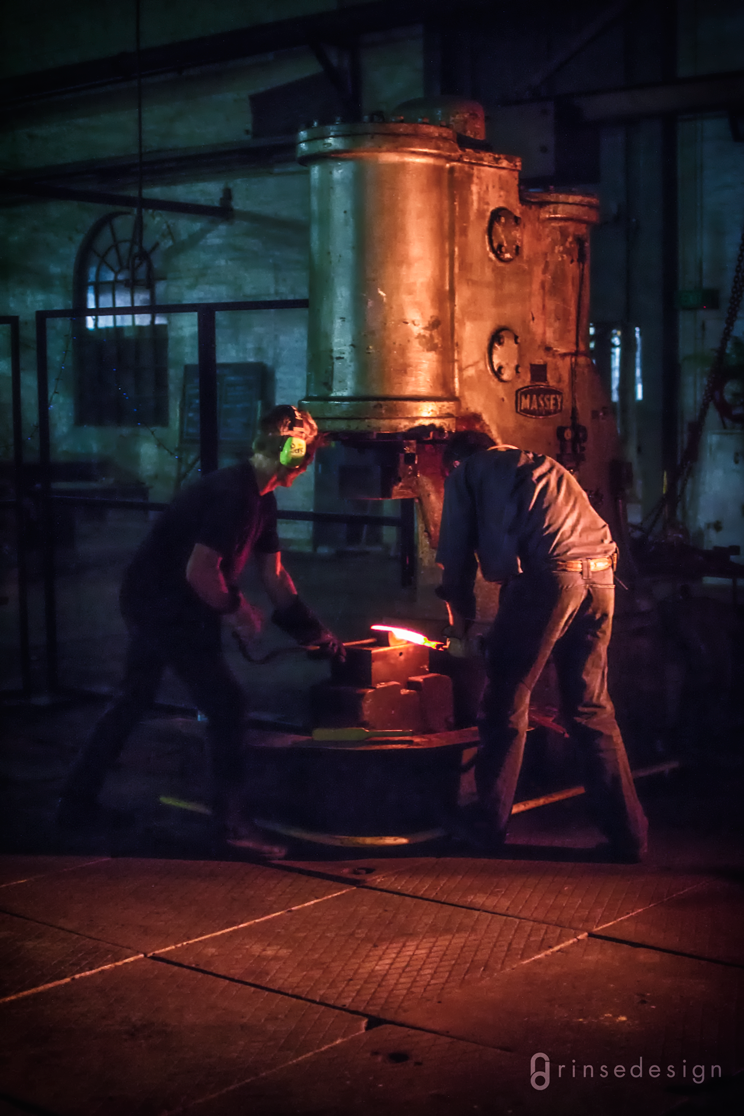
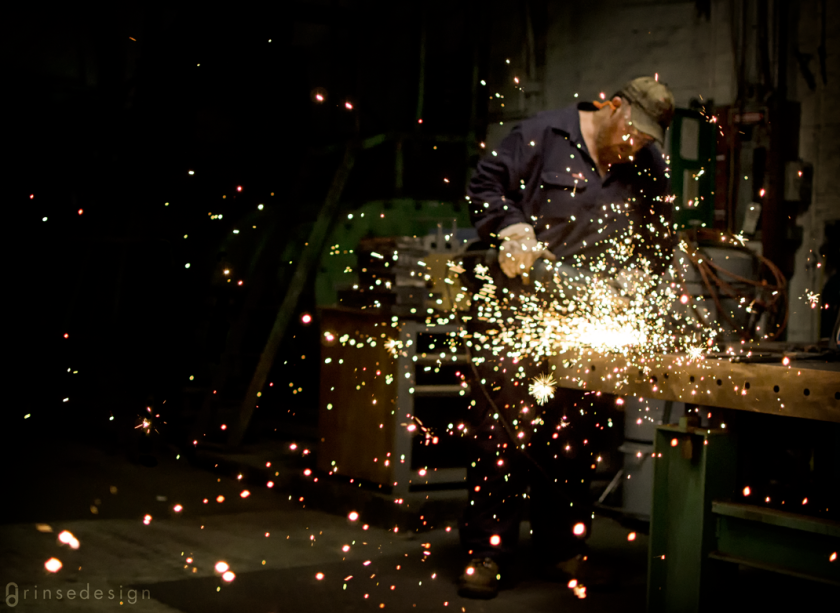
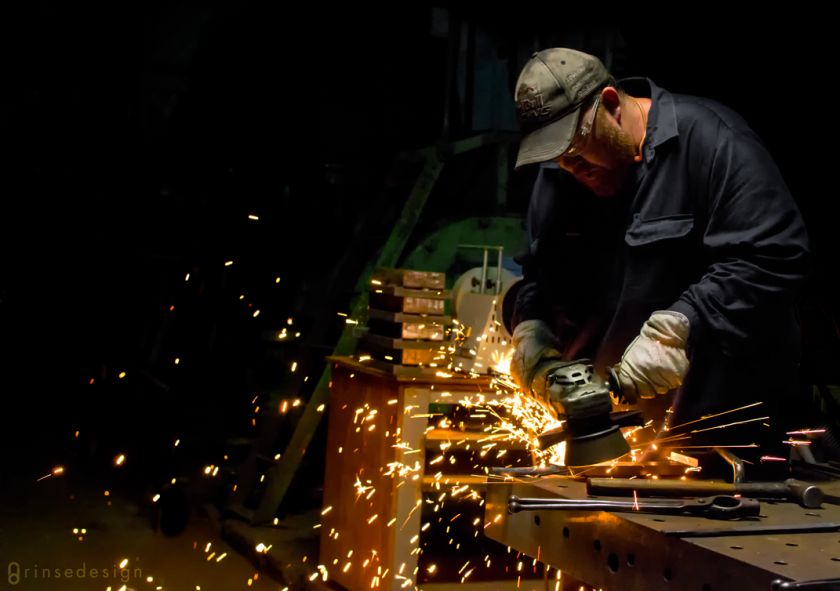
The idea went through a few twists and turns since then, and I got a semi complete series of the knife makers at Eveleigh works, but was unable to finish the series in time in a way that made sense. Besides, I had already had another idea, one that carried a lot more meaning and significance to my my own recent life experience.

After talking with my lovely new housemate Sjuzannah about the irony that in a city as teeming with people as Sydney, how you can feel so completely isolated when you are new, and people and places are all unfamiliar.

LAD1_DSC0106

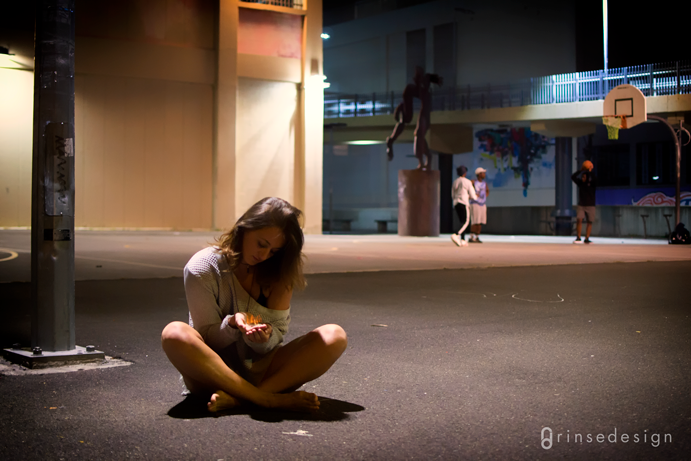
I shared with her my experience of overcoming this, in which I changed my own perception and attitude, from one of self–pity, to acceptance and gratitude, wherein I embraced my own feelings of vulnerability and insecurity.

I decided to reach out where I could, and spend the time I normally would spend on social pursuits on myself instead. I chose to pay attention to my inner feelings and take time to meditate and reflect in a way that was compassionate to myself.

_DSC0303

This has been an important lesson for me, and Sjusannah could also relate to the  experience. She agreed to be my model, and together we developed the concept to suit the original phrase, as I was too doggedly stubborn to cop out and change my theme again like in the first assessment.

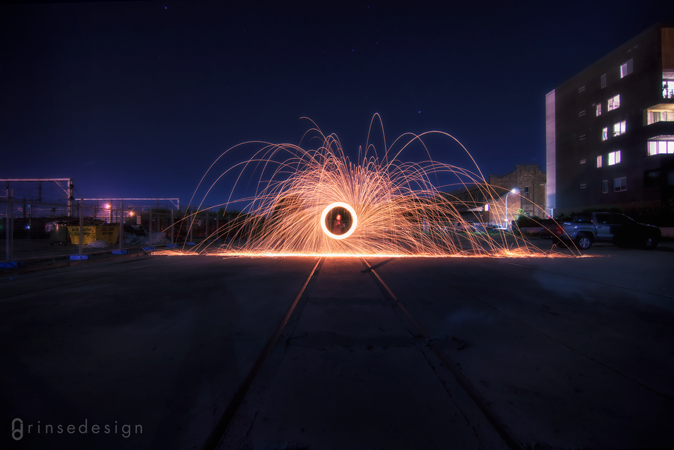
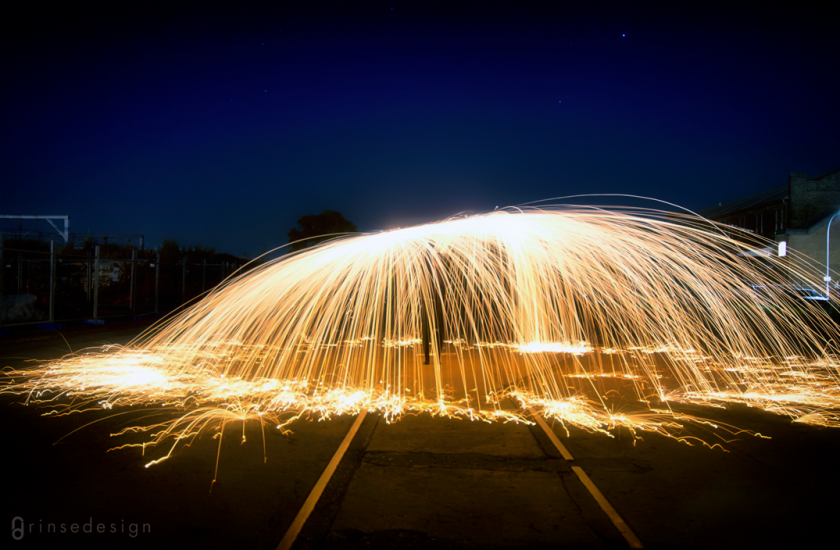
To get the shots we spent an adventurous weekend which involved getting lost dozens of times and accidentally going over the Harbour bridge twice; hiking through the undergrowth to get our sunset shots at the last possible second, several cheeky & illegal parking spots on inner city sidewalks, setting steel wool alight at Carriageworks and both getting drenched in the fountains in front of a Saturday night crowd… And incredibly, no parking tickets, police, or security attention whatsoever!

So ‘The Light After Dark” as I see it, is a series which illustrates a personal journey. It is my hope to show how for a couple of girls who felt alone, found the rewards of nurturing your own light, being your own support network, confidante and partner. How spending time listening to your inner self and paying care and attention to your thoughts and emotions, facing challenges head on with courage and calm, and overcoming obstacles with positivity and self compassion, is the best thing that one can do to nourish ones own flame so that it can burn bright from within, – authentic, unquenchable and unique.


_DSC0002

…so that it may grow…

_DSC0016

_DSC0028

_DSC0022

_DSC0027-2

..into a beacon of light that will guide and protect you, all of your days.


Lesson 11 – Output

Life Through a Lens

EDITING TECHNIQUES IN CAMERA RAW

For lesson 11 we learned about output and printing, and focused mainly on RAW image conversion and editing in Camera RAW.

I had learned to use Camera RAW just by trial and error, and usually would only use the sliders to edit my images, and never switch tools in the top toolbar. Lachlan’s demonstration has demistified these tools and I followed along eagerly, amazed at the results I got before even opening the image in Photoshop.

The first thing that we were shown was the spot healing brush. As the name suggests, this tool is mainly used in beauty retouching of portrait images.

I opened up another photo of the lovely Teya, and proceeded to effectively edit all of the character out of her image. Not something I would normally go so far with, and being an authentic kind of soul, probably not something she would entirely approve of herself, but for the sake of demonstration, here is what resulted:

BEFORE:

Teya_before

AFTER:

Teya_after

The spot healing brush in Camera RAW is here on the toolbar:

Screen-Shot-2017-05-03-at-8.55.46-pm

By selecting this brush, resizing it by using the square bracket keys [+] so that it is just a little bit larger than the spot or blemish you want to edit out, adjusting feather etc and clicking, the software automatically samples an area of surrounding skin. If you do not like the effect, undo and try again.

Screen-Shot-2017-05-03-at-4.27.19-pm

By turning on the spot visualiser option you can get a very scary and very clear visualisation of where the spots are

Screen-Shot-2017-05-03-at-4.27.57-pm

The red circle is where I have clicked to edit, the green circle is where the software has sampled the ‘replacement’ skin from

Screen-Shot-2017-05-03-at-4.29.13-pm

Screen-Shot-2017-05-03-at-4.29.26-pm

Uncheck the ‘visualize spots’ and ‘show overlay’ to see how things are looking

Screen-Shot-2017-05-03-at-4.30.08-pm

Spot healing brush is not just for spots, you can also drag it to adjust scratches and lines

As well as spot healing, we discovered a host of other capabilities I was previously unaware that Camera RAW had:

BEFORE:

surfer_DSC0039

BEFORE: The original RAW file

AFTER:

_DSC0039

AFTER: Edited solely in Camera RAW

white-balance

Selecting a sampled area of neutral grey in the clouds by looking at the RGB values under the histogram. HINT: Neutral grey values = R:119 G:119 B:119 so try and find a sample point as close as possible (within 5 points) to these values

An excellent article on finding neutral grey, or how to colour correct an image that does not have any neutral grey can be found here

Another handy technique for finding neutral grey in your image in Photoshop can be found in this article here

saturation

Targeted adjustment tool – click and drag up and down on a colour to adjust, click HUE SATURATION and LUMINANCE tabs on the right to affect these areas

adjustment-brush

Here I have used the adjustment brush to target the green on the surfers wetsuit so that I could dial down its saturation to a point where it was not so overbearing to all the other colours

parametric-curve-and-adjustment-brush

The targeted adjustment tool also works on the parametric curve, which is the second icon on the toolbar underneath the histogram

radial-filter

The radial filter – hold OPTION to draw from the centre, SHIFT to draw a perfect circle, and both to do both simultaneously

graduated-filter

The graduated filter – hold the SHIFT key to keep it horizontal

surfer_DSC0039-copy


WIP

Life Through a Lens

My phrase was chosen as: ‘The light in the dark’

I chose this phrase because honestly, I had no idea again what to plan ahead for, as I am always more inspired by what I photograph as I go along, as opposed to what I have planned ahead for.

Nonetheless, this is what I chose with the thought that for assement 1, I photographed something that I am fascinated with, – the moment frozen in time of water splashing, a moment that could never be seen with the naked eye. With this is mind, I thought I would for assessment 2, photograph something else that would not normally be seen with naked eye, and that is photographs under the cover of darkness. – How things look as they are captured in the dark over a long exposure, or when a light source suddenly pierces the darkness in some way, be it fire, a lightning flash or what have you.

I also like the idea of doing some tricky portrait shots, and have the stirrings of an idea based on isolation where a girl is going around carrying a frame that could also be an iphone and finds herself isolated even amidst the crowded city. This could be recreated in photoshop or done with props, the idea was inspired by this shot:

e933d099a127d7f0c101be74226b80e0

I am still unsure as to where I am going to take this assessment, and may still completely change my mind, but so far I have been shooting for this assessment at Eveleigh works. I have been able to take some great shots of light after dark as it is at a steel works, but I am not sure exactly what the narrative will be yet, as I will hopefully be allowed to visit again soon to capture the rest of the story..

Eveleigh_Damascus1

_DSC0392

_DSC0425

Eveleigh_Glenn2

Eveleigh_Glenn3

Eveleigh_Glenn1

I am thinking that I would like to try and get a view of Eveleigh from above, as it is in the cityscape after dark, perhaps zooming in periodically on a view of the  place until we entered the place to see what goes on in there on a daily basis.

I still have to return and get some shots of the final steps in the knifemaking process, and would like to get a long exposure of the premises and the train station behind it at night.

I have my doubts about the narrative options of using Eveleigh as my subject, as much as I love the photos so far, I also have the option of using my lovely housemate as a subject and have a vague idea about using some hand held light sources such as sparklers and her in the city and have experimented a little bit with this already:DSC_6362-2

DSC_6336-2

Portraiture Photography

Life Through a Lens

Here are some examples both past and present, of portraits I have shot. (See captions for details) I very much prefer a natural or action shot as opposed to a studio photography shoot, and love natural lighting and genuine smiles.

An example of beauty retouching using photoshop:

Here is a portrait I recently took of Teya which I have retouched for the purpose of example here. The first is the original unedited photograph, the second with all freckles and blemishes absent, the third, keeping her looking like her natural self with freckles intact, but skin smoothed, eyes and teeth brightened and lips plumped. These effects were achieved using a variety of techniques including the clone tool, dodge and burn, layer blends, the paintbrush/eyedropper tools and gaussian blur.


Lesson 9 – Narrative

Life Through a Lens

A visual or photographic narrative tells a story through a series of images. The series can be either linear or non linear.

The example above is from a non–linear photo essay by David Wells. His thoughts on the subject are very concise and a great read.

He says of the series:

“…The photos shown here are from my project: The relationship between Israelis and Palestinians. My project proposal for that project says: In 1990, before the first Madrid peace conference, I started photographing the relationship between Israelis and Palestinians. In my experience, the relationship between Palestinians and Israelis is best viewed as a spectrum. At one end of the spectrum is conflict, at the other end of the spectrum is cooperation, intentional attempts at understanding one another through dialogue groups, summer camps, etc. The middle of the spectrum is co-existence, day-to-day interactions in shared working, living, and playing spaces. Coexistence is the heart of the relationship and the part of the relationship that is most ignored in the media at large. Much of my work has been an effort to humanize (sic) both sides. My photographs of the occupation and the forced interaction between Israelis and Palestinians highlight the problems, while images of their intentional, chosen interactions show the positive possibilities. It is very telling that when I disseminate my work, in and out of the Middle East, viewers are surprised by their inability to tell Palestinian from Israeli, reminding viewers of the similarity between the two. My goal was to put a human face on the struggles for Middle East peace and to educate people both in and outside of the Middle East…” Read the whole article here.

Here is an example of a linear narrative by Duane Michals:

andywarholeatsbanana

For my photo narrative, I have included a scene which occurred the other weekend on Good Friday, when a group of friends who are still getting used to the encroachment of kids on their lives, bore witness to a miniature scene of bullying play out before them. I was photographing willy nilly and a little bit tipsy at the time, but found it intriguing that I did not fully realise what had actually happened until later, when reviewing the shots:

This slideshow requires JavaScript.

…Poor kid!

Lesson 8 – Lighting + Free Lighting Techniques for Photographers on a Budget

Life Through a Lens

I was not present lesson 8 as I had to go back to Adelaide for a few weeks for a friends wedding/Grandpa’s birthday/tie up loose ends/drive my car back up to Sydney..!

As such I missed three lessons, but the principles of which I am not entirely unfamiliar with, and so I will attempt to recreate some of the important elements, or add some alternatives of my own.

There are two types of lighting, natural and artificial. Natural light is of course light from the sun. It is free, warm and can give beautiful effects, particularly during what is known as ‘golden hour’ which is approximately the half–hour before and after both sunrise and sunset. The light hits the subject on a sideways angle and has a beautiful diffused glow, with soft shadows and a warm temperature.

However natural light can also be tricky in that it is unpredictable, uncontrollable, fleeting and sometimes very cruel to a photographic subject. The midday sun for example, is colder, creates harsh shadows and is usually very unflattering for portraits.

Artificial light can be either strobe/flash lighting or continuous lights (fluorescent/tungsten/LED’s) which can be manipulated in many ways, and is more reliable and controllable than natural light. It can be diffused, directed in different configurations towards the subject (e.g. 3–point lighting) for greater effect and can be combined with tools such as coloured gels and reflectors for greater effect.

Lighting setups can be infinitely varied, and can use any or all combinations of reflective, diffused, natural and artificial lighting to create lighting style which will vastly change the mood and effect of your photograph.

Using reflectors or an external flash, such as with a softbox or strategically placed speedlight will help to offset shadows, particularly when your subject is backlit. If you are a student, hobbyist or just do not have much of a budget for photography gizmos, there are other techniques you can use to reflect or diffuse light onto your subject. Luckily, through experimentation, trial and error and sometimes pure accident, this is something I have had some experience in:

_DSC0894

  1. Use your surroundings as a reflector. The sunlight that was reflected onto Teya from the road was enough to offset the bright mid–afternoon sun and get a lovely back–lit shot of her dancing without leaving her face obscured in shadow.

_DSC2551

2. Use a mirror to reflect light. This shot was taken using a 55–200mm lens, and a small hand held mirror to reflect light onto the subject, in this case a spider who was repairing her inconveniently–placed web, which I had put my head through a couple of times already. I have had much success with this technique when doing close ups such as in rain drop photography, but be aware that if your subject is living such as this one, that the heat and light you are reflecting will get very uncomfortable after a while, so limit the time you use it and have a spray bottle handy. (Plus droplets look good on the web!)

DSC_0257-girls-portrairt3. Use everyday objects to diffuse light and create interesting patterns in shadows.  Although it looks as though the girls are sitting by a window, in actual fact I got this effect by hanging, of all things, a woven welcome mat in front of a studio light and placing it at a distance from the subject. This effect can be wonderful when using things like lattice, mesh and other die–cut objects.

DSC_0327-3Dstudio-1

Taken using my old home made cardboard light tent and both natural and artificial light (sunlight from a window and two lamps)

DSC_0619

Taking using a studio light tent

4. Make your own DIY light tent for product/macro photography. Link to instructions here

_DSC0015

Taken without DIY reflector

_DSC0014

Taken with DIY reflector

5. Create your own DIY reflector. By using a sheet of card or similar thick, flexible material covered with a reflective material such as white paper, aluminium foil covered with baking paper, or as pictured above, a car windshield sun protector, you can make your own reflector at home for nothing.

_DSC0025

6. Utilise your angles By lying down on the ground and shooting up at Melanie, I was able to get her hair to be highlighted dramatically with the coloured light behind her.

For flash photography, I always carry a business card, and some baking paper and a rubber band in my kit. Why? If you do not have/cannot afford a speedlight and find yourself in a situation where you have no choice but to use your camera’s in–built flash, you will want to offset that sucker somehow or get ugly, washed out photos. First of all, do not forget that you can manually reduce your cameras flash in the settings by 1/2, all the way to 1/16 of the strength and no doubt beyond on some cameras. (But not mine!)

By propping a business card up in front of the flash you can bounce it up onto a ceiling or a wall, so that it is a reduced and diffused light that reflects onto your subject. Note: This does take some experimentation to get it right so don’t give up if it does not work first time.

By wrapping a small amount of baking paper, tissue paper or the like around your built in flash and securing it with a rubber band it will diffuse the light and so that your subject does not look as washed out. Note: This technique works best when you have at least one other light source on a different angle, and your flash is dialled right down. I also use this technique when doing DIY lighting setups at home using portable lamps and similar.

Of course every designer and photographer’s best friend is Adobe Photoshop. By using camera RAW and other settings you can dramatically enhance photos and reduce or increase the shadows, lighting angles and more.

A wonderful free plug–in that is a great asset to any photographer is the Nik colour eFex 4 plug–in. This is a FREE resource and I highly recommend it to my fellow students and other readers looking to improve their photographs. Get it here.

Lesson 7 – White Balance

Life Through a Lens


This week we are looking at white balance, and the effect had by using the presets in our cameras settings both correctly and incorrectly in different lighting conditions.

White balance is a setting on your digital camera which allows for increased accuracy of the colours in a captured image. It allows for greater control and flexibility when needing to compensate for the myriad of different light sources and conditions that may be encountered, enabling a truer representation of the scene.

White balance presets on a typical DSLR camera:

  • Tungsten lightbulb (household filament)
  • Fluorescent lamps
  • Flash
  • Daylight (sun overhead)
  • Cloudy (moderately overcast)
  • Shade (shadowed)
  • Auto
  • Custom
  • User defined

In general photography, having the white balance set to ‘auto’ will usually suffice. It is worth noting however, that the auto setting for your white balance is most effective when there is at least one white or colourless and bright element in the shot. Whilst not being essential for every situation, if your subject does not include something of this nature, the auto white balance can be prone to over or under–compensating the colour temperature of the shot.

It is in these circumstances that it is worth knowing about colour temperature, white balance, and how to measure it and adjust for the best results.

Here I am going to take a moment to give a big shout out to Grandpa (Malc) pictured in the following slideshow… Lesson 7 in Sydney there no sunshine to be seen, and so it was impossible to conduct the WB experiments in daylight. Back home in Adelaide for a couple of weeks, I’m here staying with Grandpa; who despite never quite being entirely at ease for too long in front of a camera, agreed to model for me to demonstrate the Kelvin colour temperature scale in sunlight. My Grandpa is my favourite person and my greatest support in life, and in my pursuit of graphic design. He turns 94 on Thursday, still plays tennis and is a deadset genuine Aussie legend.

This slideshow requires JavaScript.

The reason we need white balance settings at all is because different kinds of light have different colours. Our eyes are so effective at compensating and correcting for this that we often do not notice it until we looking at a photograph, when the colour cast suddenly becomes obvious. The majority of light sources, especially those that are natural light, give off a colour cast which ranges from a cool to warm, with neutral white in the middle.

The system of measurement for colour temperature from warm to cool is in units of Kelvin. The warmer a light source’s colour temperature is, the lower it’s number when measured in units of Kelvin. The red light of a flame will be at the lower end of the Kelvin scale, and the blue tinge of the sky on a clear day will be at the higher end.

20150330-white-balance-test-gyuri-glaszlo.com-WB-Kelvin-chart

White balance can be measured on two scales of colour: Warm to cool which is red or orange to blue, but also green to magenta. The warm to cool scale comes into play more commonly in situations like daylight, but modern artificial lighting situations such as Fluorescent bulbs may require adjusting on this green to magenta scale.

Experimenting in different light sources as in the examples here, and trying the different preset white balance settings is a great way to get a better understanding of the way these adjustment work and the effect of the Kelvin scale in photography.

More comprehensive info on the subject can be found here.

“SPLASH” Water photography Life Through a Lens – Assessment 1

Life Through a Lens

splash.

Lesson 5 – ISO / portraiture

Life Through a Lens

This week we are addressing ISO, the final of the three facets which make up the ‘triangle’ of photography. ISO is a way of measuring the sensitivity of your cameras image sensor to light. The lower the number of the ISO setting is, the less sensitive it is; the higher the number, the more sensitive it is to the light. Higher ISO settings will allow you to shoot in lower light without a flash, but also means more ‘noise’ in the image. However, this can be utilised to add mood and artistic effect, as seen in the above examples.


Lesson 4 – Aperture

Life Through a Lens

This week we are addressing aperture, the second of the three facets which make up the ‘triangle’ of photography. Aperture is a measurement of  the amount the blades inside your lens open up to allow light to enter, and is measured in f stops. The wider an aperture, the more light is allowed in, and vice versa. This means that to compensate for a wider aperture (which will be measured by a low f stop, such as f1.8) a faster shutter speed is required to compensate and the same is true in reverse.

Aperture also controls the amount of area in focus, or the depth of field. A wider aperture, (e.g. 2.2) will give a shallow depth of field and a wider area that is out of focus in the foreground and background, otherwise known as bokeh. A smaller aperture (measured in larger numbers such as f22) will give you a much broader area of focus.

This week during the class exercise I was not feeling particularly inspired. I only had a prime lens with me having left my wide angle and telephoto lenses at home. On top of this it was pelting down with rain again and for whatever reason I was feeling unusually self conscious when going out to the city to shoot, so I let myself off the hook for once with the intent to complete the exercises later. Despite being last minute, I enjoyed the shoot I created today, and am myself partial to a wide aperture and a shallow depth of field.

Here is a link to an article with great explanations behind of the nitty gritty and mathematics behind aperture as well as other juicy details.